
Wednesday, 19 November 2014
GMAXXX
Guys and dolls across my Instagram and blog!!!! So yesterday I was given this awesome item from the lovely guys at @ambisionfitness I will be writing a post up on my blog in a few weeks with before and after results. But if you can't wait go grab your #GMAXXX for an amazing Lower body workout that targets the glutes, legs and stomach. Go to www.ambisionfitness.com! My followers can enter code QELGM to get a 10% discount on all orders! #ambisionfitness #queenesotericblog #blogger #fitness #booty
Thursday, 13 November 2014
Covering up eyebrow scars secretly
Well my next post was meant to be how to do a kylie Jenner style lip, but I have a had a urgent request on how to cover up a scar on the eyebrow. Seeing as pencils and powders alone just don't quite cut the mustard and can appear patchy and obvious.


So first up to help from the inside out: if you knew me when I was younger you will know I never used to have eyebrows, not from over plucking but a genetic thing - thanks nan!! This set me out on a mission to find a way of growing eyebrows with the use of vitamins that wouldn't leave me looking like a bush monkey in areas other than my eyebrows TMI?? If you go back to the post on my blog on the 26th may 14, there will be way more details. I used the centrum multi vitamin tablets that gave me eyebrows I was completely amazed!! I'm not saying it will grow hair from a scar but the hair around it wil thicken and grow longer so you can cover up the missing patch , kinda like a eyebrow comb over haha.
Right so I don't have scars in my brows they are just sparse, so I had to use special effex makeup wax to give the effect of a scar in my Brow so I could get the closest result possible.
Firstly I used the brow marker by gosh from superdrug. It is my makeup staple. It's nothing like a waxy pencil that enhances bald patches. It creates a definite line that perfectly blends into the rest of the brow. It's also a stain so even after showering it will leave a subtle print of what was there. And the best bit yet?.. IT DOES NOT SMUDGE, or come off oily skin. It is the best thing ever invited in terms of brow stay power. There are actually 4 shades but I always use a cotton bud to blend to get the perfect tone.
After getting the base I used a brow brush to the even the hairs around the 'scar'. Next up using the MUA brow pallet from superdrug to set the brow to refrain it from looking oily and just to blend even more. I used to darkest colour at the furthest end of the brow, then gradually using the lighter colours towards the inside of the brow and blend ,blend, blend!! You don't want the brow to appear like a block at the inside. So make sure you blend. Also remember the lighter your skin tone the lighter your brows MUST be in comparison to someone with a darker skin tone, otherwise you will look washed out and clearly look fake. Just think pitch black brows, blonde hair and Lily white skin. It's not a good look.
. |  Here is a few of the products and tools I used. Thanks for reading! Q.Ex |
Fatal reaction to the CARINO hairdye!
Helloooo er'body im so sorry I haven't done a blog in ages but I've just had so much going on in my life the past few months it's just been a no go!


But I'm back and I'm back with fire in my eyes.
Right so if you follow me on Instagram (the link is at the top of the page) you will know my hair growing journey was cut short, long story short - I went to fuengirola on holiday and wanted to be a baldy in the sun! Well all round I just felt more comfortable without hair. I know most of you will think how can you feel more comfortable without hair? but it's extremely empowering being a woman with a buzz cut.
Having a bald head in the summer I love to be a platinum colour, I have to cut and bleach my hair once a week it can be quite tedious and expensive with my normal loreal preference in extreme platinum at £6. So I tried to search for a cheaper option to bleach my hair.
So I purchased the Carino hair due
From Aldi for £2.39 in lightest beige blonde.
Oh my god this has been the most horrific thing I have ever experienced. I done the patch test 48 hours prior to the actual dye. The instructions suggest to leave on for 30-40 minutes. Holy cr*p after 7 minutes my scalp was on fire, the only way I can explain the pain was like having my head tattooed with household bleach. It was truly excruciating!!
I have had blisters before from bleach but nothing on this level EVER!! I felt very poorly after and ended up going to my doctor to be given medication.
Trading standards were contacted and actually paid me a visit to my house and sent a sample to the labs to be tested.
Later found out this product contains PPD which has caused many deaths but doing a patch test will not show this up, so just a heads up - go very very careful on what you put on your hair. And a massive lesson learned - you get what you pay for.
Hope this has given everyone a heads up and a warning! Keep an eye out for my next post you beauties!
Q.Ex
Sunday, 17 August 2014
Garnier BB Cream product review
Hello everyone!

 Before
 Swatched
Massive apologies for my lack of posts recently I've had a pretty manic time!
But I'm back with a gem of a review for you all :)
First up I haven't worn foundation now for roughly 6 months and I tried to put some on the other week which ended up with me instantly washing the stuff straight off ugh!!! So I wanted to test out a BB cream to help with evening out my skin tone. After reading up on several blogs I found the most raved about was the Garnier BB Cream.
I purchased mine from boots at £7.99 as they have a deal on but I know Asda and superdrug also stock them. Normally retail at £9.99.
It comes in light and medium but it's very versatile so will blend from lily white to the blackest beauties.
So the product claims to;
Our innovative all-in-one technology hydrates for 24 hours and is enriched with a Vitamin Cderivative. It boosts radiance for a luminous, fresh complexion.
Concentrated in mineral pigments, the formula perfects the skin, leaving a unified, natural look, as though airbrushed.
Concentrated in mineral pigments, the formula perfects the skin, leaving a unified, natural look, as though airbrushed.
PRODUCT EFFECTIVENESS*
- Unifies skin complexion: 90% agree
- Gives a healthy glow: 93% agree
- Leaves complexion luminous and radiant: 81% agree
- Hides redness: 71% agree
- Skin feels moisturised: 82% agree
- Skin feels smoother on application: 96% agree
Which I completely agree it's the best thing I've ever come across base wise. The coverage evens skin tones and gives a beautiful glow, it's not heavy or thick so doesn't clog pores, and it's perfect to wear when it's hot. But I love the idea of waking up in the morning and having the same clear skin as you do with it on. No catfishes here please haha.
My only downfall to this is you need to set it with a translucent powder if you aren't putting foundation ontop which I BEG you don't, less is more ladies.
After.
I highly recommend this tinted moisturiser it will completely change the way you view foundation. And even for the makes out there who take care of themselves, try it out!!!
Thanks for reading
Wednesday, 4 June 2014
Day to day contour without foundation
KSo everyone always asks what foundation I use, when infact I haven't touched foundation for over 2 months after this new beauty regimen! So I won't be using foundation in this post but you still can if you feel uncomfortable.


First things first, your skin care regime is vitally important in keeping a youthful glow that you will be grateful for in the future! Daily gentle cleansing and moisturising is vital in this process.
Here are my favourite daily facial products I use to keep a clear flawless skin and they are very cost effective.
I've used loads of different washes but the soap and glory one is by far the best! It smells great and leaves your skin feeling so fresh and smooth!! No BS!
The Nivea express hydration primer is literally gold, it's Muilti purpose so recommend it for both sexes. I use this every time I wash my face whether I'm doing makeup or not as it's a moisturiser and you need to put the oils back into your skin after washing, and it's a brilliant primer aswell. Very silky smooth.
The products used first are a beauty blender which blends flawlessly and the illuminating touch concealer that I mentioned in a previous post!
First up take your concealer under your eye area, down the bridge of your nose and middle of forehead. Blend this by using a blotting motion! Do not drag the concealer.
Next you will need a TRANSLUCENT loose powder - NEVER use a coloured one as this will make you orange and cakey, you only need this to set the concealer and stop shine.
The sleek contour kit is also awesome it's powder which I love so it doesn't clog up your pores and comes in 3 different shades but mine is medium as I have fairly darker skin than pasty.
So set your face all over with the powder going in circular motions all over your face but focusing where the concealer is.
Taking the contour colour in the kit, start just under your cheekbones and blend up towards the hair line. You can do this either side of the nose and jawline to but this is just a day to day look we want.
This Bourjois bronzer has literally lasted me longer than any product I've ever bought I can't even remember when I bought it. And I LOVE IT!! The smell, the colour!
The best pigmented blusher that lasts the whole day without fading is this MAC blusher in pink swoon.
Take the bronzer and dust it around the forehead/hairline area, and back over where you had contour to, this makes such a big difference!! Don't skip!!
With the blusher you only want to go from the apples of your cheeks and blend down into the contour. Don't go to high or you'll cover your highlighted area.
So last but not least, the most important part. The highlighter.
I used the highlighter in the sleek kit along with soft and gentle mineralize skin finish by MAC.
With the highlighters you want it to go onto the highest parts of your face where the sun would hit, if that makes sense?
So above cheekbones, cupids bow(upper lip), bridge of nose, outer sides of your brow.
So that's my daily facial routine, and added together with the brow tutorial and a subtle eye makeup tutorial to be posted soon, this is the difference:
Monday, 2 June 2014
Eyebrow stencil review
Hello everyone and welcome back!


Sorry I haven't posted in a few days but I'm back and with an awesome product review!
So on the weekend i went to the Royal bath and west show in shepton mallet - a great show for us West Country folk!
And I came across this amazing product, I had purchased something similar a few years back that lasted for years but this is by far better! And what's great is they stock online for around £29.
The product is Cresty semi-permanent eyebrow powder and stencils, which is brill for those who can't match they're brows. This eyebrow make up is a high quality powder that is semi-permanent! – water resistant, sweat proof and smudge proof! (Big bonus points on the no smudge situation!)
In the kit comes the powder (they have a massive range of colours to choose from) 3 stencils, brow brush and instruction leaflet.
The 3 stencils are reusable and come in three sizes ; thin - normal - thick.
And here's the steps you need to follow.
- Choose the stencil according to the width and length of your brow, Thin, Natural or Thick.
- Place the stencil over your eyebrow and line the stencil up to the beginning and the middle of your brow (the inner and outer part of the stencil may be moved to match your brow shape).
- Firmly hold the stencil at the edges with your index and middle finger in a V shape over your eye.
- Lightly dab the powder on your brow for a light effect or brush the powder on, in both directions for a denser effect between the spaces of the stencil for an even coverage.
- Remove the stencil and with a cotton bud remove any excess from around the brow. You may also want to repeat this action to alter the length to your desired look.
- Once happy firmly press the make up with a cotton pad or piece of tissue to set the powder.
- Repeat onto the other eyebrow. For best results apply in the morning with your make up to clean, oil free skin.
Let me know how you get on if you do make a purchase! I would deffo recommend it completely fills in the brow area for a full and sleek look.
Wednesday, 28 May 2014
D.I.Y psychedelic dry marble nails!
Being a nail technician I thought I had better hurry up and get some nail work up on here, So these believe it or not are are FAR less messy than the water marbling method, which can be very fiddly.
First things first, here's what you need:

- 3 colours of your choice; I used prickly pear, sugar apple and bright pink all by Barry M.
- A clear topcoat
- A cocktail stick or sharp pencil.

First apply your chosen base colour - I alternated the colours for each nail.
When you apply this colour make sure it goes on thick enough to not need a second coat.
DO NOT WAIT FOR THIS TO DRY BEFORE MOVING ONTO THE NEXT STEP!! - so I done the whole process nail by nail to stop this from happening!

Take your other two colours and drop random blobs onto the nail -again don't wait for this to dry!

Now using the cocktail stick or pencil. Gently swirl the blobs into a funky pattern of your choice - here's where you can go cray and make your nails into works of art!

Iknow! Simple but pure genius :)
Let me know what you think of this tutorial, did it work for you? Or anything else you wish to see.. Post your comments below...
Tuesday, 27 May 2014
How to use tea bags to relieve tired, puffy eyes!
I am thrilled to share that I have finally come across an unbelievably affordable and natural “beauty product” that quickly and visibly reduces dark circles and diminishes puffiness: tea bags!
Yes, you read that correctly. Read on to learn how you can use tea bags to relieve tired, puffy eyes!
What you’ll need:

- Two tea bags (I find green and black tea bags containing caffeine to be the most effective)
- A mug of hot water
- A plate, container, or plastic sandwich bag
How to:
Step One

Take the two tea bags and steep them in hot water for 3-5 minutes.
Step Two

Take the tea bags out and put them in your container of choice (I used a plate). Leave them in the refrigerator for 20 minutes or until cold. While the tea bags are cooling down, you can relax by drinking the mug of delicious tea you just made – yum!
Step Three
Take the tea bags out. Gently squeeze out any excess liquid until the bags are damp and not dripping wet.
Step Four
Lay down and put the tea bags over your eyes. Leave them on for 15-30 minutes. Remove and carefully rinse off any tea stains on your face.
You can use this tea bag eye treatment every single day, once a week, twice a week, once a month, or whatever you prefer! For optimal results though, it is best to use this treatment at least once a week.
How It Works:
You probably have noticed that many eye treatments contain caffeine. This is because caffeine can help shrink blood vessels around your eye, thusreducing puffiness and dark circles.
The tea bags used in this DIY eye treatment not only contain caffeine and beneficial antioxidants, but they also contain tannins. Tannins are responsible for the tea’s color and flavor; most importantly, tannins can also stimulate healthy blood circulation and help tighten and soothe skin.
What Do You Think?
Do you like this super easy DIY? Are you going to try it out? Let me know in the comments below; I’d love to hear what you think!
Brow tutorial - step by step!
I've had soo many comments on how I do my eyebrows, if they are tattooed or what?! So I had to add my brows to the blog to help you out!

So let's begin.....
So first up il talk about the products that I swear by....
Gosh brow marker in mahogany; this stuff is crazy at staying on it literally stains the skin and doesn't come off or smudge unless you wash it off. (Superdrug)
MUA Pro brow pallet; hands down one of the best prow pallets I've used so far. Comes with 3 different colours which is great for blending and a gel to hold down those stubborn hairs.
Collection illuminating touch concealer; no joke this is my makeup bag staple! I don't wear foundation so this is my best friend, unlike every other concealer I've used from high end to drugstore this is by far the best I've come across. It blends beautifully and doesn't crack or leave any lines under the eyes. And the applicator is pretty handy to!
1. Using the brow marker underline the brow underneath and in the far corner, as this is the problem areas for smudging.
2. Using the angled brush use the darkest colour with the gel over the area marked with the marker. Blend out following the brow line with the lighter powders.
3. With the concealer outline the brow but NOT in the middle of you brow area. Blend outwards using a small concealer brush. This gives the illusion of a perfectly defined beautiful brow. Suitable for long wear day and night.
Self eyebrow threading step by step.

One of my biggest requests is threading eyebrows, so I've come up with how to do a simple quick fix self thread which can also be used on other areas such as your upper lip.
So first up you need some cotton thread, you can get this for 79p at places like wilkos!
Then to prep take a brow brush and brush all hairs in one direction in way of growth to neaten before the thread, after this take a sharp pair of small scissors and trim the top of the brow for any sticking out hairs. Now we begin...
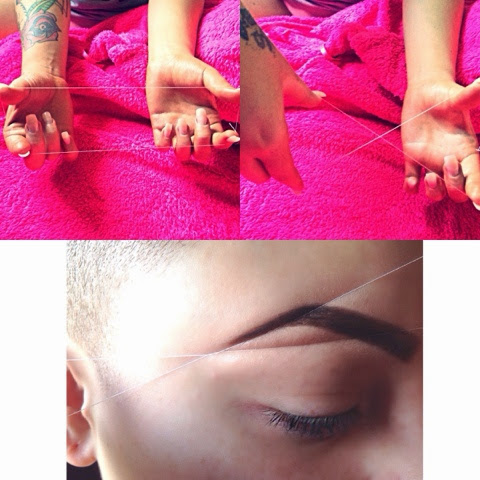
1. Take the thread and cut off and tie a loop large enough that you can move freely!
2. Twist the loop into a bow shape, twist around about 8 times. Keep your hands in the loop as pictured about as this is the technique needed to move the thread.
3. Now pull the thread taught and align the thread in the direction of hair removal needed. Then swiftly open one hand in the thread, while closing the other which will move the thread along, removing any hairs in it's path.
4. Remove any stubborn hairs with tweezers. And remember NEVER go over board with hair removal. If you find this hard, draw the shape you desire and thread around it.
Threading takes allot of trial and error- practise does indeed make perfect.
Poetic justice
Before anyone panics from the title, just slow down. I'm not about to get all sentimental and mother of the earth on you!


Here's my hair progress so far:
I finally decided how I'm going to overcome the struggle of going from short to long without messing up my hair and I am soo excited!! So I've opted (when 3inches long) I will be switching it up and going for box braids, poetic justice style! - for those who don't know what they are...
But...
Obviously me being me I still gotta keep things funky and not 'ye old traditional', so il be keeping the sides and back shaved, I can't turn my back on the bald - me and my clippers are tight homies after 6 years of it! But to mix it up even more I've opted to go for a black to pastel pink transitional style of jumbo braid, I've never seen it done before so It's already calling my name!! I will post pictures in September when the deed is done, But here's the hair that arrived the other day-
Monday, 26 May 2014
A journey of hair growth of a bald woman (part.3)
Last but not least, the final end of my review on the OROFLUIDO Range!


Super shine light spray.
This product again is a absolute beauty, here's what they're website states about the product.
Applied to dry hair
• A drier, lighter formula that allows ultra-rapid absorption
• Convenient, practical spray application for easy use in any situation
• A sensual, radiant finish with maximum shine
• Makes dry combing easier and leaves hair silky and controlled, reducing frizzing
• Adds no weight to the hair
And I completely agree with every point it truly is AMAZING!!
So last but not least is the extra goodie,
Orofluido Mascara with built in mirror & light.
This is by far the best mascara I've used to date, the wand really coats the lashes without bulking the lash out and doubles the look of the length and it doesn't flake or become dull throughout the day!! I would deffo recommend! Here's what the website states about this product:
:adds volume and coats your lashes from root totip offering perfect adherence without clumping or flaking.
The silicone brush provides even distribution of the formula and separation of lashes to achieve natural density. The luxurious golden bottle features a built- in mirror on one side and two Led lights on the cap that turn on automatically. Apply one coat for a natural finish during the day, and add extra coats for a more intense look at night.
So overall I would recommend this BIG TIME! I will always use these products from here on out, they feel like they really are helping my hair! Even though it is a little pricey the range is deffinatly worth the bucks! The only con from these products is I wish the shampoo and conditioner were bigger!!
Hope this helped!
A journey of hair growth of a bald woman (part.2)
As promised here is part 1 of my review on the OROFLUIDO range!


I happened to come across these products as i done a photoshoot for a hair salon and as lovely kind people that they are they gave me a little bundle of the range because they knew I was trying to grow out my hair for the first time in years, and starting from scratch I wanted my hair to be in perfect condition so one day I can get my hair back to the big bouncy, glossy fro I once repped as a little girl!
So In my goodie bag I received;
Shampoo & Conditioner.
Now the website states that these can be used as a daily (or whatever your hair routine is) treatment because these don't strip or harm your hairs natural oils - which is great for me having Afro Caribbean hair as I need as much oil and moisture I can get! And the smell is INSANE, they have a lush warm vanilla aroma which is just soo yummy!!
Hair Elixer.
Now I kid you not, this is literally s*x in a bottle it is simply glorious!! The texture is really thick so a little goes a long way, the smell again is to die for and the bottle is as cute as far as bottles go haha. You apply this on wet hair and leave it to work it's magic, you really can tell if you haven't used it. Your hair looks so much brighter and it genuinely feels like it has helped stimulate my hair growth.
Here's some of the natural oils listed in this little beauty:
AN EXQUISITE MIXTURE OF NATURAL OILS
Argan oil: liquid gold for your hair
Extracted from the seeds of the Argania spinosa fruit, Argan oil is rich in vitamin E and essential fatty oils, similar in composition to our own skin. It strengthens hair and makes it extremely light and incredibly silky.
Linseed oil: instant shine
The seeds of the linen plant are the source of a precious oil which seals and smoothes the hair cuticle, providing uniformity and control. The result is hair that captures and reflects the light, giving it a spectacular shine.
Cyperus oil: pure silk to the touch
Cyperus is a plant that has been cultivated in Egypt for more than 4,000 years. It is the source of an oil with a high content of fatty acids and tocopherol, which give natural protection against free radicals. It provides softness and volume, leaving hair manageable, smooth and flexible.
A journey of hair growth of a bald woman (part.1)
Right ok, so let's kick things off with my first ever post (yayy!)

Now for the past 3 years I have had my hair shaved to a buzz cut style trending different wacky colours, but since March 28th 2014 I have decided to let it grow out due to getting bored of not being able to do little things like tie my hair up.
So first up I realised this is going to be a very dramatic difficult life style change for me to adapt back to, so if I'm going to do it I'm going to go all out with the best care and nutrients! (Having Afro hair this is going to be tough work!) hence why this is my first post so you can join me on my hair growth journey.
Now for the past month or so I've been using Centrum's Fruity chewable Muilti vitamins. These are great!! They taste like sweets and have worked a treat on my system, they also contain Biotin which is what you need for a stimulated hair growth (&for nails&clear skin). You NEVER want to take full biotin tablets because they will make your skin terrible and spotty, and you really don't want that!! You only need the small dosage in Muilti vitamins!! 
Thankyou for reading part one of my hair growth journey!! Check out part 2, to hear about the amazing products by Orofluido!!
Subscribe to:
Comments (Atom)